Welcome to my Website: North Star Stamper
- Get link
- X
- Other Apps
While I have shared the measurements for my faux step card on YouTube, I thought I should write a post here so we can all find the directions easily! I know I come to my blog often to look up measurements. Let me know if I can make it easier for you to find them, too.
This card is SO easy to create and offers lots of opportunities to make a WOW card.
You'll need:
Cardstock for card base: 11" X 4-1/4": Score at 3-1/2", 7" and 9".
Cardstock for vertical step: 8" X 2-1/4": Score at 5-1/2".
Fold your card base into mountain, valley, mountain folds and burnish. Your card base should look like an "M".
Fold the step piece where you scored it. The short side goes at the top.
Add adhesive inside at the very top and very bottom. I like to use a strong adhesive, like Tear and Tape.
Add cardstock (plain, stamped or embossed) or DSP to the card base and the step.
Here I use:
Bottom step: 4" X 1-3/4"
Middle step: 4" X 3-1/4"
Inside: 4" X 3-1/4"
Vertical Step: 2" X 5-1/4"
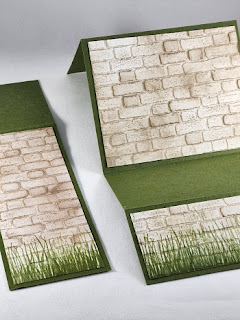
I inked my Brick & Mortar 3D embossing folder, then embossed all 3 front panels. Adding more ink with a Blending Brush after embossing shows the texture even better. I added the grass stamp from the Wildflower Path stamp set.
Adhere the panels to your card base before adhering the vertical step.
Happy Stampin'!


Comments
Post a Comment