

Last fall I shared a technique where you use 4 pieces of patterned paper, cut them all the same and then stack and shuffle them to make 4 cards. Here's that video.
I am posting a few cards on Facebook this week and thought this would be a fun way to show some different ways we paper craft.
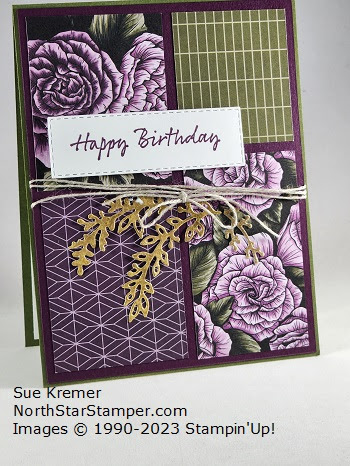
I started with 4 coordinating pieces of Designer Series Paper from the Favored Flowers pack. It's available until February 28, 2023 as a Sale-a-bration item: Free with a qualifying order.
Cut 1 piece of each pattern 3-3/4" X 5". This technique works best with smaller prints that are not spread too far apart.
Cut all 4 pieces as follows: Starting with the 1-3/4" cut.

You can play around with the cuts depending on your DSP. If one of your prints has an element you know you don't want to cut into, plan your cuts accordingly.
I'd like to try:
-cutting at 1" instead of 1-3/4' to start.
-cutting one or both sides at a diagonal
-stamping my own 4 patterns on 3-3/4" X 5" pieces of cardstock
You'll now have 4 stacks of DSP. Shuffle the stacks keeping the same sizes together. For my cards below, I looked at both sides of my patterned paper, and mixed and matched the patterns and florals.
Now you have this, with each color a different print:

Adhere the four pieces for each card onto a 4-1/8" X 5-3/8" layer. (I said 4-1/8" by 5-3/4" in the video. Sorry!) Then onto an A2 card base, a folded piece of card stock that is 4-1/4" X 5-1/2". I used top folding cards; they are easier to photograph. My card bases are 4-1/4" X 11" folded in half at 5-1/2"
Embellish and add sentiments as desired. I enjoy seeing how many different ribbons, twines, die cuts, etc. I can use on my cards. And it's great to use those neglected supplies I have in my stash!


Sorry, some of the embellishments are now retired.
 Designer Series Paper")


 Shimmer Ribbon")

Crisp Cantaloupe Thick Baker's Twine
[135636]

Basic Black Solid Baker's Twine
[141682]


")
")

I'd love to see your creations using this technique. You can post them on my Facebook business page or my Sue's Stampin' Chat Facebook group.
Happy Stampin'!
Comments
Post a Comment