
- Get link
- X
- Other Apps
Today I am sharing my own birthday card! I certainly wouldn't want my family to buy me a birthday card, so I will give them this one to give me. I usually offer them a few to choose from so they have a say in the matter, but this is a card I don't want to give away. If they give it to me, I'll get to keep it!
I had been asked about using the Enamel Effects Basics products, so that's what I started with for this card. I wasn't sure how the product would work with our masks (stencils), so I used a retired one in case I ruined the mask. I was able to clean off the mask, but I liked the effect so much that I used it on my card.
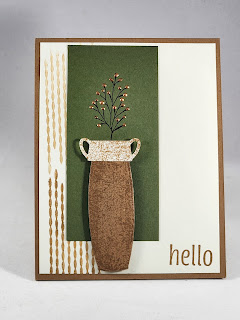
To get the flowers on the left flap of the card, I squeezed quite a bit of the copper enamel effects onto a Silicone Craft Sheet. Then using one of the Palette Knives, I spread the enamel across the mask. I need a lot more enamel than I thought I would, but I love the effect!
I cleaned my mask , palette knife, and silicone craft sheet immediately with just hand soap and they cleaned up perfectly.
Then I used the same mask, a Blending Brush and Blackberry Bliss ink to create the flowers on my second layer on the Very Vanilla panel. That panel opens up giving my family lots of room to write inside my card.
I will link everything below, but if you have your 2023-2024 annual catalog handing, here are the pages these products are on:
Our Decorative Masks are on page 136, but I used a retired one, as noted above.
Enamel Effects Basics - 137
Silicone Craft Sheet - 138
Palette Knives - 136
.jpg)
.jpg)
The one effect I'll point out is on the left side of the Very Vanilla layer. I inked up the patterned die with Pecan Pie ink and evened out the ink with a Blending Brush before I ran it through my Cut & Emboss Machine. Without the ink, the embossed images were not very visible on the cardstock. You can see that below on my scrap.
To create the handles on my vase, I used the large vase image and stamped with Pecan Pie ink on Very Vanilly cardstock. The handle die is small enough to fit 'inside' the vase image.
.jpg)
.jpg)
.jpg)
Product List

You can see my first few attempts at embossing the panel with out ink. This just became the scrap I used for creating the handles.
.jpg)
I thought of another idea for using the Enamel Effects! I didn't have time to make a card, but you'll get the idea. I squeezed small amounts of the enamel into a narrow strip of black cardstock. I then used a palette knife to drag the enamel across the cardstock. I had enough enamel left on my palette knife that I made another swipe on a narrow piece of cardstock. This narrow piece will go on the inside of my card when I make it.
.jpg)
.jpg)
For my birthday card, I used:
")


 Specialty Paper")


For the Hello card, I used:
Product List ")


I hope these cards give you some ideas for using the Enamel Effects Basics products. I used the metallic ones here. Those are copper, gold and silver. We also carry pearlized ones that are black, Real Red and white. The Real Red and white would be great finishing touches on Christmas projects!
I'd love to hear how you use our Enamel Effects. Leave a comment below so we can all learn from each other.
Comments
Post a Comment